(Below steps are required for all 2.0 themes and later)
To add subscription widget to the product page of storefront,
- Once the enComm subscriptions app is installed and plan groups are set up, login to Shopify admin.
- Once in the storefront, navigate to “Online store” on the left panel and select “Customize” in the theme editor.
- Once in the theme editor, select the desired product and under product information, select “Add block” and then select “Encomm subscriptions” from it. (Contact support if you do not see this widget)
- Drag and Drop the “enComm Subscription” under the Quantity selector section. (You can place it in any desired place where you would want the subscription widget to show up).
- Save and refresh to see the widget reflected in the product page.
To see how the above steps are done. please click here
For vintage themes, the below code changes have to be made before setting up the app. For other themes all steps are automated.
Step 1 – Add the Encomm Plugin Liquid to the product page:
In order to customize product page themes, make sure below lines of code are added to respective Liquid theme files,
- Login to the Shopify admin panel, e.g., store.myshopify.com/admin
- On the left, click Online Store and then click Themes
- Click Actions and then click Edit Code from the actions drop down
- Look for below liquid files on the left
Before modifying code, make sure you have the below file present, if not contact developer support.
Snippets/encomm-subscription.liquid
Then search for ,
product-template.liquid
If not found, look for any of these below,
product.liquid
product-form.liquid
product-detail.liquid files.
Occasionally, the file name may be listed as something different. If you do not see one of the options above and are unsure where to find the file, please get in touch with the developer support.
Once you are in one of the files listed above, look for the form tag with an action attribute set to /cart/add..
If it is Liquid code, it will look like this:
If it is HTML code, it will look like this:
Within the form tag, paste the following code:
{% render ‘encomm-subscription’ %}
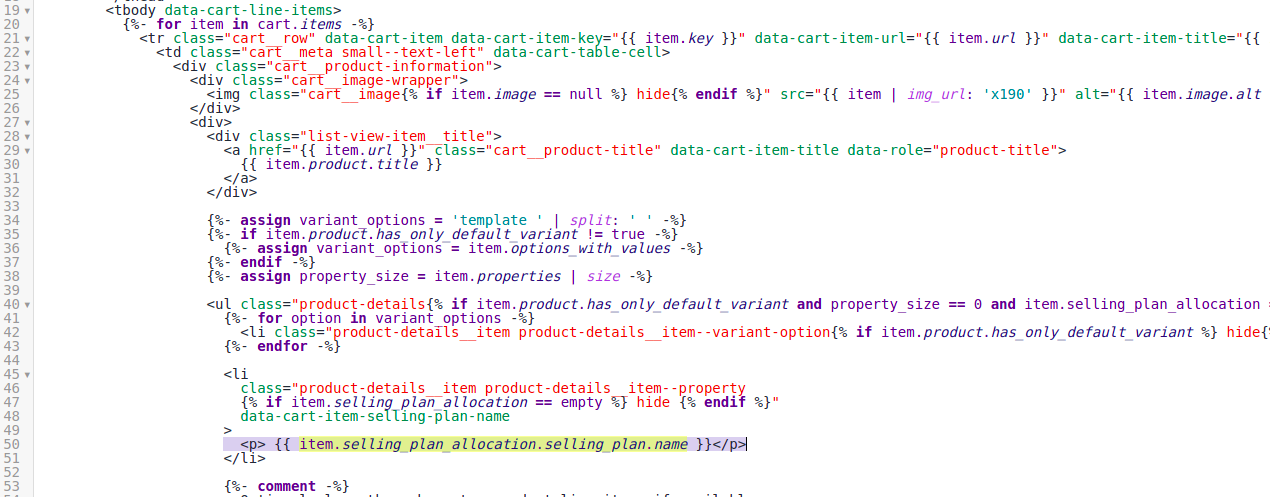
Step 2 – Add the Selling Plan Name to the cart page:
Note: If you are using Dawn theme, skip this step.
Look for, Sections->cart-template.liquid
Paste the following code like in the screenshot below:
To create subscription orders, payment processors and Sales Tax information needs to be setup on the app. Encomm app right now uses Authorize.net to process payments and Avalara to calculate Sales tax. To do this,
- Create an account on Authorize.net
- Merchant will receive an email with API key and token
- Signature key on Auth.net needs to be enabled/activated by the merchant for the app to receive webhook responses from Auth.net – If this step is skipped, orders cannot be created.
- Now navigate to the Payments tab on the Encomm app and enter the API key details.
Before placing orders,
- Create a new plan group and add products to it. These two menus can be found under the subscription tab.
- Next navigate to orders tab, and select create order. This page lets you create/modify customer info, browse and add products to cart and make a payment.
- By selecting each customer on the customers tab, subscriptions can be managed by merchants.
Feel free to get in touch with us anytime at support@encomm.com and we will get back to you super fast.
Yes, the app can automatically charge your customers. You can use the recurring feature if you are using Authorize.net as your payment gateway. You can read more about requirements here: https://help.shopify.com/en/manual/products/subscriptions/setup#eligibility-requirements.